documentations
This resource provides comprehensive details about our infrastructure and services. Here, you'll find information on how sdnog's systems are designed, built, and maintained, including various how-to articles and technical documentation. Our goal is to offer clear and detailed insights into the operations and management of sdnog services.
- sdnog Infrastructure
- sdnog services
- DNS Hosting Platform Using PowerDNS
- sdnog users creation using Ansible
- Using Algo VPN to access sdnog Infrastructure
- verify sdnog domain with google postmaster tool
- Install and Configure NetBox IPAM on Ubuntu
- Business Model Canvas for sdnog
sdnog Infrastructure
sdnog is non-for-profit organisation, operates with a small but essential infrastructure, thanks to the generous support of organizations that believe in our mission and want to help our community. We rely on these contributions to keep things running smoothly.
Currently, our infrastructure includes two servers, both kindly provided by INX.ZA:
Wiki Server
This server hosts our Wiki, which runs on Bookstack software. It’s the server you are using right now to access all the information and documentation about sdnog’s activities. This Wiki helps us gather everything in one place, making it easy for our community members to find and share important details.
cPanel Server
The second server is a cPanel server where we host our email, mailing lists, DNS, and website. We also received a donation for the basic cPanel license from INX.ZA and the ZANOG team, which helps us manage these critical services.
Even though our infrastructure is small, it’s made possible by the support of organizations that believe in what we do. Their help ensures we can continue serving our community effectively.
Special Thanks To Our Sponsors
We Would like to Thanks our wonderful sponsors! without whom our activities would not be possible
- sdnog Infrastructure Provider : INX-ZA
- Hosting project - Infrastructure Provider : INX-ZA, .SD Registry Domains , ZANOG, Global NOG Alliance.
sdnog services
This page provides an overview of the services offered by sdnog. Each service is designed to support and enhance the operations and management of the sdnog infrastructure and community.
sdnog Website
- URL: sdnog.sd
- Description: The official website for sdnog. It serves as the central hub for information about the organization, including updates, events, and general announcements. The site also provides access to other sdnog services and resources.
sdnog Wiki
- URL: docs.sdnog.sd
- Description: The sdnog Wiki is a collaborative platform for documenting sdnog’s infrastructure, projects, and best practices. It contains detailed information on how sdnog services are built, maintained, and managed. The wiki is intended for internal documentation as well as knowledge sharing within the sdnog community.
sdnog Mailing List
- URL: lists.sdnog.sd
- Description: The sdnog mailing list platform facilitates communication within the sdnog community. It is used for announcements, discussions, and sharing information related to sdnog activities. Members can subscribe to various lists based on their interests and needs.
sdnog Monitoring System
- URL: nms.sdnog.sd
- Description: The Network Monitoring System (NMS) provides real-time monitoring and status updates for sdnog’s network infrastructure. It helps track the health, performance, and availability of network resources, allowing for proactive management and quick resolution of issues.
sdnog DNS portal
- URL: dnscontrol.sdnog.sd
- Description: This service provides access to the PowerDNS web GUI for managing DNS zones within the sdnog infrastructure. Users can create, modify, and monitor DNS records through this interface. This admin panel is accessible to authorized personnel for managing DNS configurations.
sdnog Ticketing System
- URL: support.sdnog.sd
- Description: The sdnog ticketing system, powered by Request Tracker (RT), is used for managing support requests and incident reports. It provides a structured way to submit, track, and resolve support tickets related to sdnog services and infrastructure.
Support Email
- Email: support-at-sdnog.sd
- Description: For any support inquiries or assistance, users can reach out to the sdnog support team via this email address. The support team is available to address issues, answer questions, and provide help regarding sdnog services and infrastructure.
DNS Hosting Platform Using PowerDNS
The sdnog DNS-control platform is designed for high availability and reliability of DNS zones. It consists of a hidden master DNS server and two publicly visible secondary DNS servers, all running PowerDNS. This structure ensures secure DNS management and effective load distribution
Structure
- Role: Manages DNS zone files and makes updates. This server is not publicly accessible.
- Software: PowerDNS Authoritative Server
- Responsibilities: Primary source for DNS data, handles updates, and replicates changes to secondary servers.
- Access: Users do not interact with this server directly. Zone management is done through the PowerDNS web GUI https://dnscontrol.sdnog.sd/login
2. Public Secondary DNS Servers
- Role: Serve DNS records to the public, providing redundancy and load balancing.
- Software: PowerDNS Authoritative Server
- Responsibilities: Retrieve and serve DNS data from the master server.
- DNS Names: ns1.hosting.sdnog.sd and ns2.hosting.sdnog.sd

User Interaction
Users need to contact their Domain provider (eg. for .sd domains contact Sudan Internet Society) to map their domain’s NS records to the sdnog public secondary servers (ns1.hosting.sdnog.sd and ns2.hosting.sdnog.sd ) They will manage their DNS zones using the PowerDNS web GUI provided by the hidden master server. Changes made in the master server are automatically replicated to the secondary servers.
Prerequisites
Three servers with PowerDNS installed: one hidden master and two public secondaries. Proper network configuration and access controls. Basic understanding of DNS and PowerDNS configuration.
Installation
1. Install PowerDNS on All Servers
On each server (master and secondaries), install PowerDNS Authoritative Server. This example uses a Debian-based system:
sudo apt update
sudo apt install pdns-server pdns-backend-mysql
follow this page to setup DB: https://www.digitalocean.com/community/tutorials/how-to-install-and-configure-powerdns-with-a-mariadb-backend-on-ubuntu-14-04
2. Configure the Hidden Master DNS Server
Edit the PowerDNS Configuration File
Open /etc/powerdns/pdns.conf and configure the following parameters:
 master=yes
 allow-axfr-ips=IP_OF_SECONDARY1,IP_OF_SECONDARY2
 webserver=yes
 webserver-address=127.0.0.1
 webserver-port=8081
Replace IP_OF_SECONDARY1 and IP_OF_SECONDARY2 with the IP addresses of the secondary servers. Ensure the web server is only accessible from internal IPs or localhost.
Set Up the Database
Configure the database connection in /etc/powerdns/pdns.conf. For mysql:
mysql -u powerdns_user -p USE powerdns;
Next we will crate a new row in the supermasters table. This row will specify the master server IP address, and the Fully Qualified Domain Name (FQDN) of the slave server we are currently configuring.
insert into supermasters values ('111.111.111.111', 'ns2.example-dns.com', 'admin');
Add DNS Zones
Use the PowerDNS web GUI or pdnsutil tool to add and manage DNS zones:
 pdnsutil create-zone example.com
 pdnsutil add-record example.com www A 192.0.2.1
Restart PowerDNS
sudo systemctl restart pdns 3. Configure the Public Secondary DNS Servers
Edit the PowerDNS Configuration File
On each secondary server, open /etc/powerdns/pdns.conf and configure:
master=noSet Up Zone Transfers
Configure the secondary servers to request zone transfers from the master server:
notify-axfr-ips=MASTER_IP Replace MASTER_IP with the IP address of the hidden master server.
Reload DNS Zones
Use the pdnsutil tool to add the zones as secondary:
pdnsutil add-zone example.com ns1.hosting.sdnog.sd Restart PowerDNS
sudo systemctl restart pdns4. Update NS Records
Contact your Domain provider (eg.the Sudan Internet Society) to map your domain’s NS records to: ns1.hosting.sdnog.sd ns2.hosting.sdnog.sd.
5. Verify the Configuration
Test DNS resolution and replication using tools like dig:
dig @ns1.hosting.sdnog.sd example.com
dig @ns2.hosting.sdnog.sd example.com
Ensure that updates on the master are correctly replicated to the secondary servers.
Troubleshooting
- Check Logs: Review logs in /var/log/syslog or /var/log/pdns.log for errors.
- Verify Connectivity: Ensure all servers communicate properly and that firewalls are correctly configured.
- Zone Transfer Issues: Confirm that allow-axfr-ips and notify-axfr-ips are set correctly.
sdnog users creation using Ansible
Ansible Playbook: Sudo Users creation with SSH Keys
This page was written by Manhal Mohamed, sdnog team, on 11 August 2024.
This Ansible playbook configures users with sudo privileges, sets up SSH keys, and requires users to change their password upon first login.
Overview
The playbook performs the following tasks:
- Installs necessary packages based on the operating system (Debian/Ubuntu or RedHat/CentOS).
- Checks if users already exist.
- Generates passwords for new users.
- Creates new users with these passwords and assigns them to the sudo group.
- Sets passwords to expire upon the user's first login.
- Deploys SSH public keys for users.
- Sends the password to users via email.
Variables
- users: A list of users to be created, each with the following attributes:
- username: The username for the new account.
- ssh_key: The SSH public key to be deployed for the user.
- email: The email address where the password will be sent.
Tasks
Task 1. Install Required Packages
For Debian/Ubuntu
  - name: needed packages are installed (Debian/Ubuntu)
    apt:
      name: "{{ item }}"
      state: latest
    loop: ["sudo", "openssh-server", "mailutils"]
    when: ansible_facts['os_family'] == "Debian"
For RedHat/CentOS
  - name: needed packages are installed (RedHat/CentOS)
    yum:
      name: "{{ item }}"
      state: latest
    loop: ["sudo", "openssh-server", "mailx"]
    when: ansible_facts['os_family'] == "RedHat"
Task 2. Check if Users Exist and Set Facts for New Users
  - name: Check if users exist and set fact for new users
    command: "getent passwd {{ item.username }}"
    register: user_check
    loop: "{{ users }}"
    changed_when: false
    failed_when: false
Task 3. Generate Passwords for New Users
  - name: Generate passwords for new users
    set_fact:
      user_passwords: "{{ user_passwords | default({}) | combine({item.item.username: lookup('password', '/dev/null length=15 chars=ascii_letters+digits')}) }}"
    loop: "{{ user_check.results }}"
    when: item.stdout == ""
Task 4. Create New Users with Plain-Text Passwords
  - name: Create new users with plain-text passwords if they do not exist
    user:
      name: "{{ item.username }}"
      password: "{{ user_passwords[item.username] | default('') | password_hash('sha512') }}"
      groups: sudo
      append: yes
      create_home: yes
      shell: /bin/bash
      update_password: on_create
      expires: -1
    loop: "{{ users }}"
    when: item.username in user_passwords
Task 5. Set Password to Expire Upon First Login
  - name: Set password to expire upon first login for newly created users
    command: chage -d 0 "{{ item.username }}"
    loop: "{{ users }}"
    when: item.username in user_passwords
Task 6. Deploy SSH Public Keys for the Users
  - name: Deploy SSH public keys for the users
    authorized_key:
      user: "{{ item.username }}"
      state: present
      key: "{{ item.ssh_key }}"
    loop: "{{ users }}"
Task 7. Send Password to Users via Email
  - name: Send password to users via email
    mail:
      host: relay.example.com
      port: 25
      to: "{{ item.email }}"
      subject: "Your new account password"
      body: |
        Dear {{ item.username }},

        Your new account has been created on the following host: {{ ansible_host }}.

        Username: {{ item.username }}
        Password: {{ user_passwords[item.username] }}

        Please change your password upon first login.
        **Note:** This is an automated message generated by Ansible. Please do not reply to this email.


        Best regards,
        Sdnog Team

      from: sdnog-ansible-at-email.com
    loop: "{{ users }}"
    when: item.username in user_passwords
Appendix : The Full Code
  - name: Configure sudo users with SSH keys and require password change on first login
    hosts: host-ip-address
    become: true
    vars:
      users:
        - username: sdnog-user
          ssh_key: "ssh-ed25519 some SSH KEY here eddsa-key-20240807"
          email: "email-at-example.com"

    tasks:
      - name: needed packages are installed (Debian/Ubuntu)
        apt:
          name: "{{ item }}"
          state: latest
        loop: ["sudo", "openssh-server", "mailutils"]
        when: ansible_facts['os_family'] == "Debian"

      - name: needed packages are installed (RedHat/CentOS)
        yum:
          name: "{{ item }}"
          state: latest
        loop: ["sudo", "openssh-server", "mailx"]
        when: ansible_facts['os_family'] == "RedHat"

      - name: Check if users exist and set fact for new users
        command: "getent passwd {{ item.username }}"
        register: user_check
        loop: "{{ users }}"
        changed_when: false
        failed_when: false

      - name: Generate passwords for new users
        set_fact:
          user_passwords: "{{ user_passwords | default({}) | combine({item.item.username: lookup('password', '/dev/null length=15 chars=ascii_letters+digits')}) }}"
        loop: "{{ user_check.results }}"
        when: item.stdout == ""

      - name: Create new users with plain-text passwords if they do not exist
        user:
          name: "{{ item.username }}"
          password: "{{ user_passwords[item.username] | default('') | password_hash('sha512') }}"
          groups: sudo
          append: yes
          create_home: yes
          shell: /bin/bash
          update_password: on_create
          expires: -1
        loop: "{{ users }}"
        when: item.username in user_passwords

      - name: Set password to expire upon first login for newly created users
        command: chage -d 0 "{{ item.username }}"
        loop: "{{ users }}"
        when: item.username in user_passwords

      - name: Deploy SSH public keys for the users
        authorized_key:
          user: "{{ item.username }}"
          state: present
          key: "{{ item.ssh_key }}"
        loop: "{{ users }}"

      - name: Send password to users via email
        mail:
          host: relay.example.com
          port: 25
          to: "{{ item.email }}"
          subject: "Your new account password"
          body: |
            Dear {{ item.username }},

            Your new account has been created on the following host: {{ ansible_host }}.
            Username: {{ item.username }}
            Password: {{ user_passwords[item.username] }}

            Please change your password upon first login.

            **Note:** This is an automated message generated by Ansible. Please do not reply to this email.

            Best regards,
            Sdnog Team

          from: sdnog-ansible-at-example.com
        loop: "{{ users }}"
        when: item.username in user_passwords
Using Algo VPN to access sdnog Infrastructure
This page was written by Manhal Mohamed, sdnog team, on 8 August 2024.
Algo VPN simplifies deploying a secure VPN server across multiple platforms. This guide provides a step-by-step walkthrough for setting up Algo VPN on a local Ubuntu server to securely access the sdnog infrastructure.
Prerequisites
Before starting, ensure the following:
- Operating System: Ubuntu Server (18.04 or later)
- Privileges: Sudo access on the server
- Skills: Basic familiarity with command-line operations
Step-by-Step Setup
1. Update Your System
Before installing Algo VPN, ensure that your system is up-to-date. Open a terminal and run the following commands:
sudo apt update
sudo apt upgrade -y
2. Install Dependencies
Algo VPN requires certain dependencies to be installed. Use the following commands to install them:
apt-get install git apparmor build-essential python3-dev python3-pip python3-setuptools python3-virtualenv libffi-dev libssl-dev -y3. Clone the Algo VPN Repository
Clone the Algo VPN repository from GitHub to your local server:
git clone https://github.com/trailofbits/algo.git
cd algo
4. Create and Activate a Python Virtual Environment
Create a Python virtual environment and activate it:
cd algo
python3 -m virtualenv --python=/usr/bin/python3 .env
source .env/bin/activate
5. Install Algo VPN
Install Algo VPN and its dependencies using pip:
python3 -m pip install -U pip virtualenv
python3 -m pip install -r requirements.txt
6. Configure Algo VPN
Run the Algo VPN setup script to create a configuration file:
./algo
Follow the prompts to configure your VPN. You will need to provide details such as:
The VPN server's public IP address or domain name Your preferred VPN protocol (e.g., WireGuard or IPsec) User accounts for VPN access
7. Deploy Algo VPN
Once the configuration is complete, deploy Algo VPN with the following command:
./algoThe deployment process will set up the VPN server according to the configuration you provided.
TASK [Set required ansible version as a fact] *************************************************************************************************
ok: [localhost] => (item=ansible==2.9.7)

TASK [Verify Python meets Algo VPN requirements] **********************************************************************************************
ok: [localhost] => {
    "changed": false,
    "msg": "All assertions passed"
}

TASK [Verify Ansible meets Algo VPN requirements] *********************************************************************************************
ok: [localhost] => {
    "changed": false,
    "msg": "All assertions passed"
}
[WARNING]: Found variable using reserved name: no_log

PLAY [Ask user for the input] *****************************************************************************************************************

TASK [Gathering Facts] ************************************************************************************************************************
ok: [localhost]
[Cloud prompt]
What provider would you like to use?
    1. DigitalOcean
    2. Amazon Lightsail
    3. Amazon EC2
    4. Microsoft Azure
    5. Google Compute Engine
    6. Hetzner Cloud
    7. Vultr
    8. Scaleway
    9. OpenStack (DreamCompute optimised)
    10. CloudStack (Exoscale optimised)
    11. Linode
    12. Install to existing Ubuntu 18.04 or 20.04 server (for more advanced users)

Enter the number of your desired provider
:
12

Type 12 and hit Enter to setup Algo VPN on Ubuntu 20.04 server. You will be asked for several questions as shown below:

TASK [Set facts based on the input] ***************************************************************************************************************************************************************************************
ok: [localhost]
[Cellular On Demand prompt]
Do you want macOS/iOS IPsec clients to enable "Connect On Demand" when connected to cellular networks?
[y/N]
:y

TASK [Cellular On Demand prompt] ******************************************************************************************************************************************************************************************
ok: [localhost]
[Wi-Fi On Demand prompt]
Do you want macOS/iOS IPsec clients to enable "Connect On Demand" when connected to Wi-Fi?
[y/N]
:y

TASK [Wi-Fi On Demand prompt] *********************************************************************************************************************************************************************************************
ok: [localhost]
[Trusted Wi-Fi networks prompt]
List the names of any trusted Wi-Fi networks where macOS/iOS IPsec clients should not use "Connect On Demand"
(e.g., your home network. Comma-separated value, e.g., HomeNet,OfficeWifi,AlgoWiFi)
:HomeNet

TASK [Trusted Wi-Fi networks prompt] **************************************************************************************************************************************************************************************
ok: [localhost]
[Compatible ciphers prompt]
Do you want the VPN to support Windows 10 or Linux Desktop clients? (enables compatible ciphers and key exchange, less secure)
[y/N]
:y

TASK [Compatible ciphers prompt] ******************************************************************************************************************************************************************************************
ok: [localhost]
[Retain the CA key prompt]
Do you want to retain the CA key? (required to add users in the future, but less secure)
[y/N]
:y

TASK [Retain the CA key prompt] *******************************************************************************************************************************************************************************************
ok: [localhost]
[DNS adblocking prompt]
Do you want to install an ad blocking DNS resolver on this VPN server?
[y/N]
:y

TASK [DNS adblocking prompt] **********************************************************************************************************************************************************************************************
ok: [localhost]
[SSH tunneling prompt]
Do you want each user to have their own account for SSH tunneling?
[y/N]
:N
Enter the IP address of your server: (or use localhost for local installation):
[localhost]
:
localhost
TASK [local : pause] **************************************************************************************************************************
ok: [localhost]

TASK [local : Set the facts] ******************************************************************************************************************
ok: [localhost]
[local : pause]
What user should we use to login on the server? (note: passwordless login required, or ignore if you're deploying to localhost)
[root]
:
root

Enter the public IP address or domain name of your server: (IMPORTANT! This is used to verify the certificate)
vpn.jnb.sdnog.sd
8. Access sdnog Infrastructure
Once the installation has been completed successfully, you should get the following output:
TASK [debug] **********************************************************************************************************************************
ok: [localhost] => {
    "msg": [
        [
            "\"#                          Congratulations!                            #\"",
            "\"#                     Your Algo server is running.                     #\"",
            "\"#    Config files and certificates are in the ./configs/ directory.    #\"",
            "\"#              Go to https://whoer.net/ after connecting               #\"",
            "\"#        and ensure that all your traffic passes through the VPN.      #\"",
            "\"#                     Local DNS resolver 172.18.7.104                   #\"",
            ""
        ],
        "    \"#        The p12 and SSH keys password for new users is 7OEfSUZt0       #\"\n",
        "    \"#        The CA key password is g5AvcHzZygjV@4AN       #\"\n",
        "    "
    ]
}

PLAY RECAP ************************************************************************************************************************************
localhost                  : ok=125  changed=39   unreachable=0    failed=0    skipped=53   rescued=0    ignored=0
After the installation, you should see the configuration file for each VPN profile using the following command:
ls configs/your-server-ip/wireguard/
You should see all the profile in the following output:
apple desktop.conf desktop.png laptop.conf laptop.png phone.conf phone.png user1.conf user1.png
You can use any of the above files on your client device to connect to the Algo VPN server.
To access sdnog infrastructure via the VPN, you need to configure your local machine to connect to the VPN server.
Download the VPN client configuration files from the Algo VPN setup and import them into your VPN client.
For WireGuard, you can use the wg-quick tool to connect:
sudo wg-quick up /path/to/your/configuration.conf
For IPsec, follow the instructions specific to your operating system to import the configuration and connect.
9. Adding new VPN users
- Update the users list in your config.cfg.
vim config.cfg
users:
  - laptop
  - desktop
  - sdnog
  - Sara
  - Nishal
  - Manhal
  - Hafiz
- Open a terminal, cd to the algo directory, and activate the virtual environment with :
source .env/bin/activate
Run the command and it will require password , us the output password from step 8
./algo update-user
After this process completes, the Algo VPN server will contain only the users listed in the config.cfg file.
Troubleshooting
- If you encounter issues during installation or configuration:
cd algo/
sudo rm -rf /etc/wireguard/*
rm -rf configs/*
Then immediately re-run ./algo.
- Check the Algo VPN documentation for troubleshooting tips.
- Ensure that your firewall rules allow VPN traffic.
- Verify that your VPN client is correctly configured.
Conclusion
By following these steps, you should have a functioning Algo VPN setup on your local Ubuntu server, providing secure access to the sdnog infrastructure. For more advanced configurations and additional features, refer to the Algo VPN GitHub repository.
verify sdnog domain with google postmaster tool
This page was written by Sara Alamin sdnog team, on 25 October 2021
We have noticed some participants subscribe to sdnog mailing list using gmail accounts. and they do not receive some of the list's email and some being forwarded to the Junk folder. this because the DKIM and DMARC fail with domain gmail.com
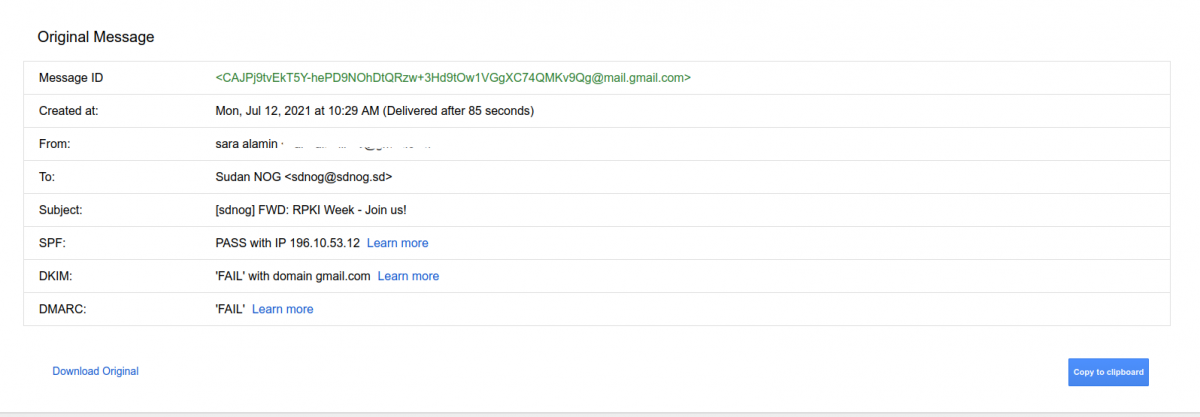
so there are many steps need to be fixed , one of them verifying the sdnog.sd domain with google Postmaster Tools, and here we will see how could be done.
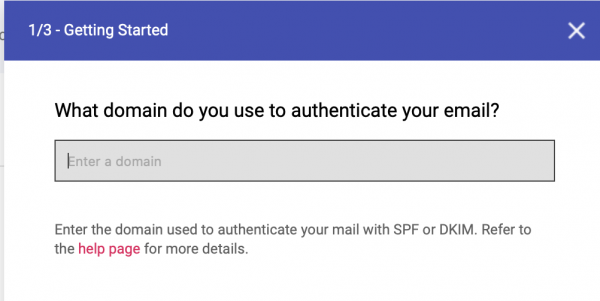
1. You need to generate a DNS validation key TXT resource record from google Postmaster Tools using a gmail account. login and the enter domain name you want to verify
2. then copy the TXT record and add this to your DNS zone file , and then click on verify.
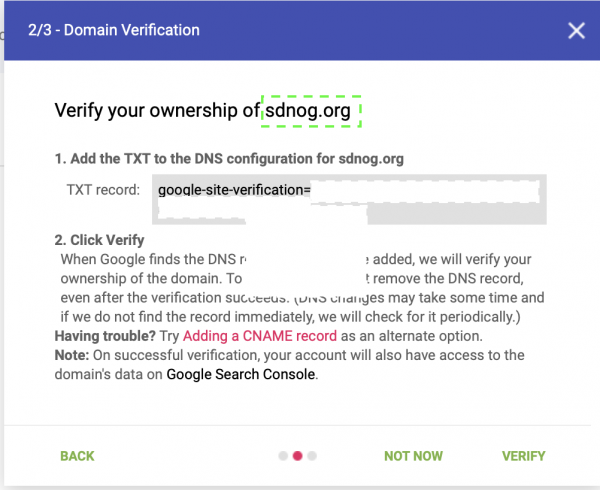
3. after few minutes, the domain will be verified.

Troubleshooting
the above steps seems very easy to do. but while we are doing this for sdnog.sd we found some issues. We added the TXT record to the zone, but it was not propagated to DNS secondaries:
 $ dig txt sdnog.sd
 ;; ANSWER SECTION:
 sdnog.sd.		60	IN	TXT	"v=spf1 mx a ip4:196.10.53.12 ip6:2001:43f8:1f3:a00::12  a:mail.sdnog.sd ~all"
so we noticed not all sdnog secondaries servers are synced, using "dig soa sdnog.sd +nssearch" command:
 $ dig soa sdnog.sd +nssearch | awk -F ' ' ' {print $4, $10, $11}'
 2021051905 server 185.70.56.53
 2021051905 server 193.110.181.53
 2021102409 server 206.220.228.134
 2021051905 server 196.10.54.53
 2021102409 server 196.216.2.1
 2021051905 server 196.10.55.53
 2021051905 server 196.10.52.53
so we checked the acl section and " allow-transfer" option to know if we have any limitation on how the zone could be transferred.
after fixing some configuration here, we updated the "Serial" time for the zone and restarted the service. and now everything is fine
 $ dig txt sdnog.sd
 ;; ANSWER SECTION:
 sdnog.sd.		60	IN	TXT	"v=spf1 mx a ip4:196.10.53.12 ip6:2001:43f8:1f3:a00::12  a:mail.sdnog.sd ~all"
 sdnog.sd.		60	IN	TXT	"google-site-verification=FijZa4-e16D4V2Vqe6gnMgWa5fALU6tozOzWeOtOtgo"
and all the secondaries are synced :
 $ dig soa sdnog.sd +nssearch | awk -F ' ' ' {print $4, $10, $11}'
 2021102409 server 185.70.56.53
 2021102409 server 193.110.181.53
 2021102409 server 206.220.228.134
 2021102409 server 196.216.2.1
 2021102409 server 196.10.54.53
 2021102409 server 196.10.55.53
 2021102409 server 196.10.52.53
Install and Configure NetBox IPAM on Ubuntu
This page was written by Manhal Mohamed, sdnog team, on 16 August 2024.
Ensure the following packages and dependencies are installed:
- Python 3.8 or higher
- PostgreSQL 12 or higher
- Redis
- Netbox 3.0 or higher
- Nginx
- Gunicorn
Create a non-root user with sudo access netboxuser
Install and configure PostgreSQL
Install PostgreSQL:
sudo apt install postgresql libpq-dev -y
Start the database server:
sudo systemctl start postgresql
Enable the database server to start automatically on reboot:
sudo systemctl enable postgresql
Change the default PostgreSQL password:
sudo passwd postgres
Switch to the postgres user:
su - postgres
Log in to PostgreSQL:
psql
Create the NetBox database:
CREATE DATABASE netbox;
Create the netbox user with a strong password (replace my_strong_password with a secure one):
CREATE USER netbox WITH ENCRYPTED PASSWORD 'my_strong_password';
Grant privileges to the netbox user on the netbox database:
GRANT ALL PRIVILEGES ON DATABASE netbox TO netbox;
Exit PostgreSQL:
\q
Return to your non-root sudo user account:
exit
2. Install Redis®
Redis® is an in-memory key-value store used by NetBox for caching and queuing.
Install Redis®:
sudo apt install -y redis-server
3. Install and configure NetBox
Install all required packages:
sudo apt install python3 python3-pip python3-venv python3-dev build-essential libxml2-dev libxslt1-dev libffi-dev libpq-dev libssl-dev zlib1g-dev git -y
Update pip to the latest version:
sudo pip3 install --upgrade pip
Create the installation directory and change to it:
sudo mkdir -p /opt/netbox/ && cd /opt/netbox/
Clone NetBox from the official Git repository:
sudo git clone -b master https://github.com/netbox-community/netbox.git .
Create a system user named netbox:
sudo adduser --system --group netbox
Grant the netbox user ownership of the media directory:
sudo chown --recursive netbox /opt/netbox/netbox/media/
cd /opt/netbox/netbox/netbox/
Copy the example configuration file:
sudo cp configuration_example.py configuration.py
Create a symbolic link for the Python binary:
sudo ln -s /usr/bin/python3 /usr/bin/python
Generate a random SECRET_KEY for the configuration:
sudo /opt/netbox/netbox/generate_secret_key.py
Copy the generated secret key and use it in the configuration file.
Edit the configuration file:
sudo nano /opt/netbox/netbox/netbox/configuration.py
Update the file with the following settings:
ALLOWED_HOSTS = ['*']

DATABASE = {
    'NAME': 'netbox',
    'USER': 'netbox',
    'PASSWORD': 'my_strong_password',
    'HOST': 'localhost',
    'PORT': '',
}

SECRET_KEY = '<generated_secret_key>'
Run the upgrade script:
sudo /opt/netbox/upgrade.sh Enter the Python virtual environment:
source /opt/netbox/venv/bin/activate Navigate to the NetBox directory:
cd /opt/netbox/netbox Create a superuser account:
python3 manage.py createsuperuser Reboot the system:
sudo reboot
4. Configure Gunicorn
Copy the Gunicorn configuration file:
sudo cp /opt/netbox/contrib/gunicorn.py /opt/netbox/gunicorn.py
5. Configure Systemd
Copy the systemd service files:
sudo cp /opt/netbox/contrib/*.service /etc/systemd/system/ Reload the systemd daemon:
sudo systemctl daemon-reload Start the NetBox services:
sudo systemctl start netbox netbox-rq Enable the services to start at boot:
sudo systemctl enable netbox netbox-rq
6. Configure Nginx Web Server
Install the Nginx web server:
sudo apt install -y nginx Copy the Nginx configuration file:
sudo cp /opt/netbox/contrib/nginx.conf /etc/nginx/sites-available/netbox
Edit the configuration file:
sudo nano /etc/nginx/sites-available/netbox
Replace the server name with your server's IP address:
server {
    listen 80;
    server_name 192.0.2.10;  # Update this with your server's IP

    client_max_body_size 25m;

    location /static/ {
        alias /opt/netbox/netbox/static/;
    }

    location / {
        proxy_pass http://127.0.0.1:8001;
        proxy_set_header X-Forwarded-Host $http_host;
        proxy_set_header X-Real-IP $remote_addr;
        proxy_set_header X-Forwarded-Proto $scheme;
    }
}
Delete the default Nginx configuration:
sudo rm /etc/nginx/sites-enabled/default
Create a symbolic link for the NetBox configuration:
sudo ln -s /etc/nginx/sites-available/netbox /etc/nginx/sites-enabled/netbox
Restart the Nginx service:
sudo systemctl restart nginx
access your url via the browser
Business Model Canvas for sdnog
An idea by Manhal Mohamed: a Business Model Canvas for sdnog
| Key Partners | Key Activities | Key Resources |
|---|---|---|
|
|
|
| Value Propositions | Customer Relationships | Channels |
|
|
|
| Customer Segments | Cost Structure | Revenue Streams |
|
|
|