This page was written by Manhal Mohamed, sdnog team, on 11 August 2024.
This Ansible playbook configures users with sudo privileges, sets up SSH keys, and requires users to change their password upon first login. #### Overview The playbook performs the following tasks: 1. Installs necessary packages based on the operating system (Debian/Ubuntu or RedHat/CentOS). 2. Checks if users already exist. 3. Generates passwords for new users. 4. Creates new users with these passwords and assigns them to the sudo group. 5. Sets passwords to expire upon the user's first login. 6. Deploys SSH public keys for users. 7. Sends the password to users via email. #### Variables - **users**: A list of users to be created, each with the following attributes: - **username**: The username for the new account. - **ssh\_key**: The SSH public key to be deployed for the user. - **email**: The email address where the password will be sent. #### Tasks ##### Task 1. Install Required Packages For Debian/Ubuntu ``` - name: needed packages are installed (Debian/Ubuntu) apt: name: "{{ item }}" state: latest loop: ["sudo", "openssh-server", "mailutils"] when: ansible_facts['os_family'] == "Debian" ``` For RedHat/CentOS ``` - name: needed packages are installed (RedHat/CentOS) yum: name: "{{ item }}" state: latest loop: ["sudo", "openssh-server", "mailx"] when: ansible_facts['os_family'] == "RedHat" ``` ##### Task 2. Check if Users Exist and Set Facts for New Users ``` - name: Check if users exist and set fact for new users command: "getent passwd {{ item.username }}" register: user_check loop: "{{ users }}" changed_when: false failed_when: false ``` ##### Task 3. Generate Passwords for New Users ``` - name: Generate passwords for new users set_fact: user_passwords: "{{ user_passwords | default({}) | combine({item.item.username: lookup('password', '/dev/null length=15 chars=ascii_letters+digits')}) }}" loop: "{{ user_check.results }}" when: item.stdout == "" ``` ##### Task 4. Create New Users with Plain-Text Passwords ``` - name: Create new users with plain-text passwords if they do not exist user: name: "{{ item.username }}" password: "{{ user_passwords[item.username] | default('') | password_hash('sha512') }}" groups: sudo append: yes create_home: yes shell: /bin/bash update_password: on_create expires: -1 loop: "{{ users }}" when: item.username in user_passwords ``` ##### Task 5. Set Password to Expire Upon First Login ``` - name: Set password to expire upon first login for newly created users command: chage -d 0 "{{ item.username }}" loop: "{{ users }}" when: item.username in user_passwords ``` ##### Task 6. Deploy SSH Public Keys for the Users ``` - name: Deploy SSH public keys for the users authorized_key: user: "{{ item.username }}" state: present key: "{{ item.ssh_key }}" loop: "{{ users }}" ``` ##### Task 7. Send Password to Users via Email ``` - name: Send password to users via email mail: host: relay.example.com port: 25 to: "{{ item.email }}" subject: "Your new account password" body: | Dear {{ item.username }}, Your new account has been created on the following host: {{ ansible_host }}. Username: {{ item.username }} Password: {{ user_passwords[item.username] }} Please change your password upon first login. **Note:** This is an automated message generated by Ansible. Please do not reply to this email. Best regards, Sdnog Team from: sdnog-ansible-at-email.com loop: "{{ users }}" when: item.username in user_passwords ``` ##### Appendix : The Full Code ``` - name: Configure sudo users with SSH keys and require password change on first login hosts: host-ip-address become: true vars: users: - username: sdnog-user ssh_key: "ssh-ed25519 some SSH KEY here eddsa-key-20240807" email: "email-at-example.com" tasks: - name: needed packages are installed (Debian/Ubuntu) apt: name: "{{ item }}" state: latest loop: ["sudo", "openssh-server", "mailutils"] when: ansible_facts['os_family'] == "Debian" - name: needed packages are installed (RedHat/CentOS) yum: name: "{{ item }}" state: latest loop: ["sudo", "openssh-server", "mailx"] when: ansible_facts['os_family'] == "RedHat" - name: Check if users exist and set fact for new users command: "getent passwd {{ item.username }}" register: user_check loop: "{{ users }}" changed_when: false failed_when: false - name: Generate passwords for new users set_fact: user_passwords: "{{ user_passwords | default({}) | combine({item.item.username: lookup('password', '/dev/null length=15 chars=ascii_letters+digits')}) }}" loop: "{{ user_check.results }}" when: item.stdout == "" - name: Create new users with plain-text passwords if they do not exist user: name: "{{ item.username }}" password: "{{ user_passwords[item.username] | default('') | password_hash('sha512') }}" groups: sudo append: yes create_home: yes shell: /bin/bash update_password: on_create expires: -1 loop: "{{ users }}" when: item.username in user_passwords - name: Set password to expire upon first login for newly created users command: chage -d 0 "{{ item.username }}" loop: "{{ users }}" when: item.username in user_passwords - name: Deploy SSH public keys for the users authorized_key: user: "{{ item.username }}" state: present key: "{{ item.ssh_key }}" loop: "{{ users }}" - name: Send password to users via email mail: host: relay.example.com port: 25 to: "{{ item.email }}" subject: "Your new account password" body: | Dear {{ item.username }}, Your new account has been created on the following host: {{ ansible_host }}. Username: {{ item.username }} Password: {{ user_passwords[item.username] }} Please change your password upon first login. **Note:** This is an automated message generated by Ansible. Please do not reply to this email. Best regards, Sdnog Team from: sdnog-ansible-at-example.com loop: "{{ users }}" when: item.username in user_passwords ``` # Using Algo VPN to access sdnog InfrastructureThis page was written by Manhal Mohamed, sdnog team, on 8 August 2024.
Algo VPN simplifies deploying a secure VPN server across multiple platforms. This guide provides a step-by-step walkthrough for setting up Algo VPN on a local Ubuntu server to securely access the sdnog infrastructure. #### Prerequisites Before starting, ensure the following: - **Operating System:** Ubuntu Server (18.04 or later) - **Privileges:** Sudo access on the server - **Skills:** Basic familiarity with command-line operations #### Step-by-Step Setup ##### 1. Update Your System Before installing Algo VPN, ensure that your system is up-to-date. Open a terminal and run the following commands: ``` sudo apt update sudo apt upgrade -y ``` ##### 2. Install Dependencies Algo VPN requires certain dependencies to be installed. Use the following commands to install them: ``` apt-get install git apparmor build-essential python3-dev python3-pip python3-setuptools python3-virtualenv libffi-dev libssl-dev -y ``` ##### 3. Clone the Algo VPN Repository Clone the Algo VPN repository from GitHub to your local server: ``` git clone https://github.com/trailofbits/algo.git cd algo ``` ##### 4. Create and Activate a Python Virtual Environment Create a Python virtual environment and activate it: ``` cd algo python3 -m virtualenv --python=/usr/bin/python3 .env source .env/bin/activate ``` ##### 5. Install Algo VPN Install Algo VPN and its dependencies using pip: ``` python3 -m pip install -U pip virtualenv python3 -m pip install -r requirements.txt ``` ##### 6. Configure Algo VPN Run the Algo VPN setup script to create a configuration file: ``` ./algo ``` Follow the prompts to configure your VPN. You will need to provide details such as: The VPN server's public IP address or domain name Your preferred VPN protocol (e.g., WireGuard or IPsec) User accounts for VPN access ##### 7. Deploy Algo VPN Once the configuration is complete, deploy Algo VPN with the following command: ``` ./algo ``` The deployment process will set up the VPN server according to the configuration you provided. ``` TASK [Set required ansible version as a fact] ************************************************************************************************* ok: [localhost] => (item=ansible==2.9.7) TASK [Verify Python meets Algo VPN requirements] ********************************************************************************************** ok: [localhost] => { "changed": false, "msg": "All assertions passed" } TASK [Verify Ansible meets Algo VPN requirements] ********************************************************************************************* ok: [localhost] => { "changed": false, "msg": "All assertions passed" } [WARNING]: Found variable using reserved name: no_log PLAY [Ask user for the input] ***************************************************************************************************************** TASK [Gathering Facts] ************************************************************************************************************************ ok: [localhost] [Cloud prompt] What provider would you like to use? 1. DigitalOcean 2. Amazon Lightsail 3. Amazon EC2 4. Microsoft Azure 5. Google Compute Engine 6. Hetzner Cloud 7. Vultr 8. Scaleway 9. OpenStack (DreamCompute optimised) 10. CloudStack (Exoscale optimised) 11. Linode 12. Install to existing Ubuntu 18.04 or 20.04 server (for more advanced users) Enter the number of your desired provider : 12 Type 12 and hit Enter to setup Algo VPN on Ubuntu 20.04 server. You will be asked for several questions as shown below: TASK [Set facts based on the input] *************************************************************************************************************************************************************************************** ok: [localhost] [Cellular On Demand prompt] Do you want macOS/iOS IPsec clients to enable "Connect On Demand" when connected to cellular networks? [y/N] :y TASK [Cellular On Demand prompt] ****************************************************************************************************************************************************************************************** ok: [localhost] [Wi-Fi On Demand prompt] Do you want macOS/iOS IPsec clients to enable "Connect On Demand" when connected to Wi-Fi? [y/N] :y TASK [Wi-Fi On Demand prompt] ********************************************************************************************************************************************************************************************* ok: [localhost] [Trusted Wi-Fi networks prompt] List the names of any trusted Wi-Fi networks where macOS/iOS IPsec clients should not use "Connect On Demand" (e.g., your home network. Comma-separated value, e.g., HomeNet,OfficeWifi,AlgoWiFi) :HomeNet TASK [Trusted Wi-Fi networks prompt] ************************************************************************************************************************************************************************************** ok: [localhost] [Compatible ciphers prompt] Do you want the VPN to support Windows 10 or Linux Desktop clients? (enables compatible ciphers and key exchange, less secure) [y/N] :y TASK [Compatible ciphers prompt] ****************************************************************************************************************************************************************************************** ok: [localhost] [Retain the CA key prompt] Do you want to retain the CA key? (required to add users in the future, but less secure) [y/N] :y TASK [Retain the CA key prompt] ******************************************************************************************************************************************************************************************* ok: [localhost] [DNS adblocking prompt] Do you want to install an ad blocking DNS resolver on this VPN server? [y/N] :y TASK [DNS adblocking prompt] ********************************************************************************************************************************************************************************************** ok: [localhost] [SSH tunneling prompt] Do you want each user to have their own account for SSH tunneling? [y/N] :N Enter the IP address of your server: (or use localhost for local installation): [localhost] : localhost TASK [local : pause] ************************************************************************************************************************** ok: [localhost] TASK [local : Set the facts] ****************************************************************************************************************** ok: [localhost] [local : pause] What user should we use to login on the server? (note: passwordless login required, or ignore if you're deploying to localhost) [root] : root Enter the public IP address or domain name of your server: (IMPORTANT! This is used to verify the certificate) vpn.jnb.sdnog.sd ``` ##### 8. Access sdnog Infrastructure Once the installation has been completed successfully, you should get the following output: ``` TASK [debug] ********************************************************************************************************************************** ok: [localhost] => { "msg": [ [ "\"# Congratulations! #\"", "\"# Your Algo server is running. #\"", "\"# Config files and certificates are in the ./configs/ directory. #\"", "\"# Go to https://whoer.net/ after connecting #\"", "\"# and ensure that all your traffic passes through the VPN. #\"", "\"# Local DNS resolver 172.18.7.104 #\"", "" ], " \"# The p12 and SSH keys password for new users is 7OEfSUZt0 #\"\n", " \"# The CA key password is g5AvcHzZygjV@4AN #\"\n", " " ] } PLAY RECAP ************************************************************************************************************************************ localhost : ok=125 changed=39 unreachable=0 failed=0 skipped=53 rescued=0 ignored=0 ``` After the installation, you should see the configuration file for each VPN profile using the following command: ``` ls configs/your-server-ip/wireguard/ ``` You should see all the profile in the following output: ``` apple desktop.conf desktop.png laptop.conf laptop.png phone.conf phone.png user1.conf user1.png ``` You can use any of the above files on your client device to connect to the Algo VPN server. To access sdnog infrastructure via the VPN, you need to configure your local machine to connect to the VPN server. Download the VPN client configuration files from the Algo VPN setup and import them into your VPN client. For WireGuard, you can use the wg-quick tool to connect: ``` sudo wg-quick up /path/to/your/configuration.conf ``` For IPsec, follow the instructions specific to your operating system to import the configuration and connect. ##### 9. Adding new VPN users - Update the users list in your config.cfg. ``` vim config.cfg users: - laptop - desktop - sdnog - Sara - Nishal - Manhal - Hafiz ``` - Open a terminal, cd to the algo directory, and activate the virtual environment with : ``` source .env/bin/activate ``` Run the command and it will require password , us the output password from step 8 ``` ./algo update-user ``` After this process completes, the Algo VPN server will contain only the users listed in the config.cfg file. ##### Troubleshooting - If you encounter issues during installation or configuration: ``` cd algo/ sudo rm -rf /etc/wireguard/* rm -rf configs/* ``` Then immediately re-run ./algo. - Check the Algo VPN documentation for troubleshooting tips. - Ensure that your firewall rules allow VPN traffic. - Verify that your VPN client is correctly configured. ##### Conclusion By following these steps, you should have a functioning Algo VPN setup on your local Ubuntu server, providing secure access to the sdnog infrastructure. For more advanced configurations and additional features, refer to the Algo VPN GitHub repository. # verify sdnog domain with google postmaster toolThis page was written by Sara Alamin sdnog team, on 25 October 2021
We have noticed some participants subscribe to [sdnog mailing list](https://sdnog.sd/index.php/mailing-list) using gmail accounts. and they do not receive some of the list's email and some being forwarded to the Junk folder. this because the DKIM and DMARC fail with domain gmail.com [](https://docs.sdnog.sd/uploads/images/gallery/2024-11/dkim-and-dmark-failed.png) so there are many steps need to be fixed , one of them verifying the sdnog.sd domain with google Postmaster Tools, and here we will see how could be done. 1\. You need to generate a DNS validation key TXT resource record from google [Postmaster Tools ](https://support.google.com/mail/answer/9981691)using a gmail account. login and the enter domain name you want to verify [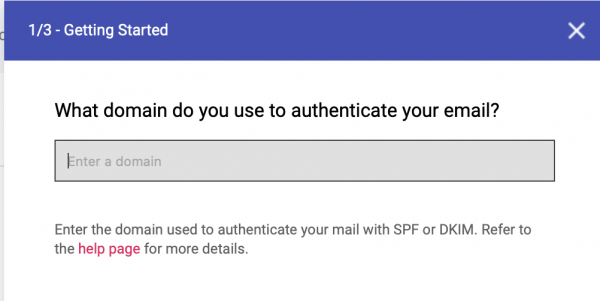](https://docs.sdnog.sd/uploads/images/gallery/2024-11/add-the-domain-to-be-authenticated.png) 2\. then copy the TXT record and add this to your DNS zone file , and then click on verify. [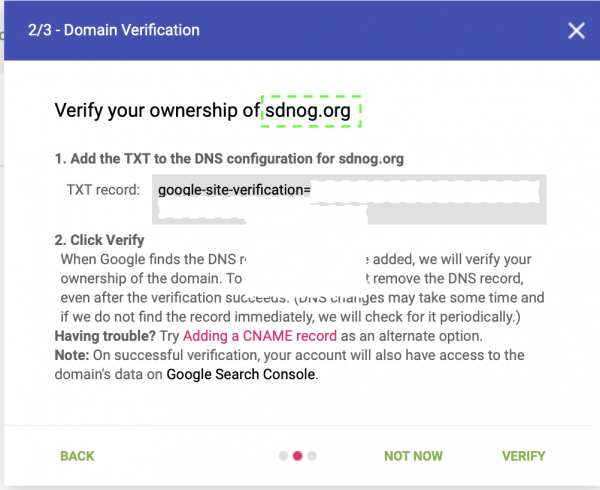](https://docs.sdnog.sd/uploads/images/gallery/2024-11/add-txt-record-to-dns.png) 3\. after few minutes, the domain will be verified. [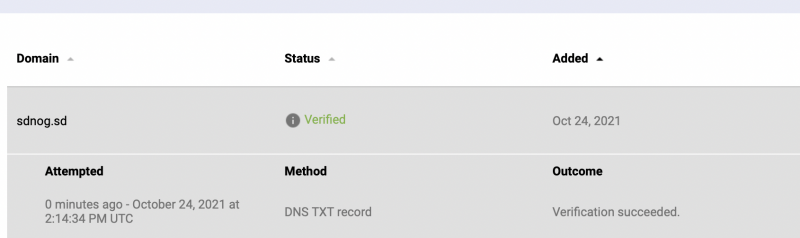](https://docs.sdnog.sd/uploads/images/gallery/2024-11/the-domain-has-been-verified.png) ##### Troubleshooting the above steps seems very easy to do. but while we are doing this for sdnog.sd we found some issues. We added the TXT record to the zone, but it was not propagated to DNS secondaries: ``` $ dig txt sdnog.sd ;; ANSWER SECTION: sdnog.sd. 60 IN TXT "v=spf1 mx a ip4:196.10.53.12 ip6:2001:43f8:1f3:a00::12 a:mail.sdnog.sd ~all" ``` so we noticed not all sdnog secondaries servers are synced, using "dig soa sdnog.sd +nssearch" command: ``` $ dig soa sdnog.sd +nssearch | awk -F ' ' ' {print $4, $10, $11}' 2021051905 server 185.70.56.53 2021051905 server 193.110.181.53 2021102409 server 206.220.228.134 2021051905 server 196.10.54.53 2021102409 server 196.216.2.1 2021051905 server 196.10.55.53 2021051905 server 196.10.52.53 ``` so we checked the acl section and " allow-transfer" option to know if we have any limitation on how the zone could be transferred. after fixing some configuration here, we updated the "Serial" time for the zone and restarted the service. and now everything is fine ``` $ dig txt sdnog.sd ;; ANSWER SECTION: sdnog.sd. 60 IN TXT "v=spf1 mx a ip4:196.10.53.12 ip6:2001:43f8:1f3:a00::12 a:mail.sdnog.sd ~all" sdnog.sd. 60 IN TXT "google-site-verification=FijZa4-e16D4V2Vqe6gnMgWa5fALU6tozOzWeOtOtgo" ``` and all the secondaries are synced : ``` $ dig soa sdnog.sd +nssearch | awk -F ' ' ' {print $4, $10, $11}' 2021102409 server 185.70.56.53 2021102409 server 193.110.181.53 2021102409 server 206.220.228.134 2021102409 server 196.216.2.1 2021102409 server 196.10.54.53 2021102409 server 196.10.55.53 2021102409 server 196.10.52.53 ``` # Install and Configure NetBox IPAM on UbuntuThis page was written by Manhal Mohamed, sdnog team, on 16 August 2024.
Ensure the following packages and dependencies are installed: - Python 3.8 or higher - PostgreSQL 12 or higher - Redis - Netbox 3.0 or higher - Nginx - Gunicorn Create a non-root user with sudo access **netboxuser** #### Install and configure PostgreSQL Install PostgreSQL: `sudo apt install postgresql libpq-dev -y` Start the database server: `sudo systemctl start postgresql` Enable the database server to start automatically on reboot: `sudo systemctl enable postgresql` Change the default PostgreSQL password: `sudo passwd postgres` Switch to the postgres user: `su - postgres` Log in to PostgreSQL: `psql` Create the NetBox database: `CREATE DATABASE netbox;` Create the netbox user with a strong password (replace my\_strong\_password with a secure one): `CREATE USER netbox WITH ENCRYPTED PASSWORD 'my_strong_password';` Grant privileges to the netbox user on the netbox database: `GRANT ALL PRIVILEGES ON DATABASE netbox TO netbox;` Exit PostgreSQL: `\q` Return to your non-root sudo user account: `exit` ##### 2. Install Redis® Redis® is an in-memory key-value store used by NetBox for caching and queuing. Install Redis®: `sudo apt install -y redis-server` ##### 3. Install and configure NetBox Install all required packages: `sudo apt install python3 python3-pip python3-venv python3-dev build-essential libxml2-dev libxslt1-dev libffi-dev libpq-dev libssl-dev zlib1g-dev git -y` Update pip to the latest version: `sudo pip3 install --upgrade pip` Create the installation directory and change to it: `sudo mkdir -p /opt/netbox/ && cd /opt/netbox/` Clone NetBox from the official Git repository: `sudo git clone -b master https://github.com/netbox-community/netbox.git .` Create a system user named netbox: `sudo adduser --system --group netbox` Grant the netbox user ownership of the media directory: `sudo chown --recursive netbox /opt/netbox/netbox/media/` Navigate to the configuration directory: `cd /opt/netbox/netbox/netbox/` Copy the example configuration file: `sudo cp configuration_example.py configuration.py` Create a symbolic link for the Python binary: `sudo ln -s /usr/bin/python3 /usr/bin/python` Generate a random SECRET\_KEY for the configuration: `sudo /opt/netbox/netbox/generate_secret_key.py` Copy the generated secret key and use it in the configuration file. Edit the configuration file: `sudo nano /opt/netbox/netbox/netbox/configuration.py` Update the file with the following settings: ``` ALLOWED_HOSTS = ['*'] DATABASE = { 'NAME': 'netbox', 'USER': 'netbox', 'PASSWORD': 'my_strong_password', 'HOST': 'localhost', 'PORT': '', } SECRET_KEY = 'An idea by Manhal Mohamed: a Business Model Canvas for sdnog
| Key Partners | Key Activities | Key Resources |
|---|---|---|
| - Internet Service Providers in Sudan - Technology companies - Educational institutions - Government agencies related to telecommunications - International network operator groups | - Organizing forums and events for knowledge exchange - Providing network education and training - Facilitating technical collaboration - Promoting open-source technologies - Conducting research on network technologies | - Volunteer network engineers and experts - Technical knowledge and expertise - Community of network professionals - Online platforms for communication and collaboration |
| Value Propositions | Customer Relationships | Channels |
| - Open platform for knowledge exchange in networking - Capacity building in network engineering - Enhancing the quality of Internet services in Sudan - Promoting collaboration among network professionals - Access to cutting-edge network technologies and practices | - Community-based interactions - Peer-to-peer learning and support - Long-term engagement through regular events and forums | - Online forums and discussion boards - Physical events and meetups - Workshops and training sessions - Social media platforms - Website and email newsletters |
| Customer Segments | Cost Structure | Revenue Streams |
| - Network engineers in Sudan - Internet Service Providers - Technology companies - Students and researchers in networking fields - Government agencies involved in telecommunications | - Event organization expenses - Online platform maintenance - Educational materials development - Volunteer coordination costs - Marketing and outreach expenses | - Membership fees (if applicable) - Sponsorships from technology companies - Grants from educational or research institutions - Donations from community members - Fees for specialized workshops or training sessions |